


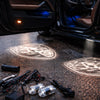
The Most Common Puddle Light Mistakes And How To Avoid Them
A great method to improve the convenience, safety, and style of your car is to upgrade your puddle lights. Like any automobile modification, though, it's simple to fall victim to common errors that might result in damage, frustration, or just an unpleasant outcome. In order to guarantee a seamless and fruitful update experience, this guide identifies the most common puddle light installation mistakes and offers helpful guidance on how to prevent them.

We'll go over the typical problems that DIY installers and even some professional installs face, such as improper wiring and overheating LEDs. Some people faced issues stating that "when we had one puddle light replaced, the same light on the other side stayed, the puddle lights on that side were much dimmer compared to the newly upgraded one". You may reduce hazards and extend the life and functionality of your new puddle lights by being aware of these possible issues.
Troubleshooting Puddle Light Issues
-
Check if the puddle light is faulty or if it’s a wiring issue - a faulty design can cause the light to malfunction.
-
Verify that the puddle light is properly connected to the battery and that the wiring is not damaged.
-
Use a TECH2 diagnostic tool to analyze the issue and identify the root cause.
-
Check for any plugged-in devices, such as USB flash drives or cell phone chargers, that may be causing the issue.
-
Consult related threads and forums for similar issues and solutions.
-
The same light problem remained after replacing the puddle light on one side, as the other lights—side puddle lights stayed flawlessly.
Choosing the Wrong Bulb or Unit
Possibly the most frequent error is this one. Not every vehicle can use every type of LED puddle light, and not all of them are made equal.
Buying bulbs or units that are not the proper size, voltage, or connector type for your vehicle is a mistake.
How to Prevent It: Find out exactly what kind of bulb your automobile needs. Refer to your owner's manual, reliable car parts stores, or internet bulb guides (such as those from Phillips or Sylvania). Make sure the plug-and-play units you purchase are made for your make, model, and year by carefully reviewing the compatibility chart.
Incorrect Connections and Wiring
A variety of issues, including blown fuses, broken lights, and even electrical damage, can result from wiring errors.
Errors include reversing polarity, improperly splicing wires, utilizing subpar connectors, or neglecting to adequately insulate connections.
How to Prevent It: Before performing any electrical repairs on your vehicle, always unplug the battery. Make use of high-quality connectors made for automotive applications and the appropriate wire equipment (crimpers, strippers). For a safe and waterproof connection while splicing wires, use solder and heat-shrinking tubing.
Corroded or Loose Connections
Even with correct wiring, flickering, dimming, or total failure of the puddle lights might be caused by loose or corroded connections.
Error: Connections were exposed to moisture and filth due to improper connection security.
How to Prevent It: Make sure that every connection is tight and safe. Apply dielectric grease to connectors to stop moisture penetration and corrosion. Check connections frequently for corrosion and clean them as necessary. Simple carelessness in these areas is frequently the root cause of puddle light connection issues.
Overpowering the Circuit
Electrical fires, blown fuses, and overheating can result from exceeding the circuit's current capability.
Installing LEDs that consume a lot more electricity than the original bulbs was a mistake.
How to Prevent It: Verify the original bulbs' amperage rating and make sure the LEDs you select use the same or less current. Steer clear of utilizing LEDs that are too bright since this could overload the circuit. In addition to being a safety risk, vehicle puddle lights that overheat can significantly reduce the lights' lifespan.
Flickering LED Puddle Lights and Early Failure
LEDs produce heat, and their longevity depends on adequate heat dissipation.
Error: Using LEDs with insufficient heat sinks and installing them in confined housings without proper ventilation.
How to Prevent It: Select LEDs with built-in cooling fins or heat sinks. Use heat-conductive paste between the LED and the housing, or add ventilation holes if you're placing LEDs in enclosed housings. Flickering LED puddle lights can cause premature failure and are frequently an early indicator of overheating.
Improper Positioning or Alignment
Even when installed correctly, misaligned or ill-positioned puddle lights might appear untidy and inefficient.
Errors include installing lights at an incorrect angle, obstructing the light with trim or other objects, and not symmetrically aligning the lights.
How to Prevent It: Prior to installation, carefully consider where to put the lights. To make sure they are correctly aligned, use a level or straightedge. Check the light output and make any necessary positional adjustments. Automotive puddle light alignment is a minor detail but has a significant impact, so take your time.
Ignoring Weatherproofing
Because puddle lights are exposed to the weather, they must be properly weatherproofed.
Error: Using non-waterproof connectors and improperly sealing housings, which left exposed wire.
How to Prevent It: Seal housings and connectors with waterproof gaskets or silicone sealant. Make sure that every piece of wiring is adequately insulated and moisture-proofed. Check the lights for indications of water incursion on a regular basis, and fix any leaks right away. One of the main causes of corrosion and early failure in puddle lights is water damage.
Low-cost, subpar LED Installation
Despite the allure of saving money, inexpensive LEDs are frequently unreliable and prone to malfunction.
Error: Purchasing LEDs from unreliable vendors, selecting LEDs only on the basis of cost, and disregarding brand repute.
How to Prevent It: Buy LEDs from reliable companies that are well-known for their dependability and quality. Prior to making a purchase, read reviews and compare specifications. Don't forget that you get what you pay for! Price over quality is a common cause of LED light errors.
Best Practices for Puddle Light Installation and Replacement
-
Ensure proper grounding to avoid stray currents induced by another circuit.
-
Use the correct replacement bulb to avoid compatibility issues.
-
Follow the manufacturer’s instructions for installation and replacement.
-
Test the puddle light after installation to ensure it’s working properly.
-
Consider seeking professional help if you’re not comfortable with the installation process.

Ignoring Testing Prior to Final Assembly
You can save a great deal of time and stress by avoiding this common error.
Error: Finishing the installation procedure without first testing the lights.
How to Prevent It: Make sure the lights are functioning correctly by connecting the battery and testing them before reassembling door panels or trim. This enables you to detect and address any problems quickly before they become more challenging to resolve.
Conclusion
A successful and fulfilling upgrade is ensured by avoiding these typical puddle light errors. You may get flawlessly lighted puddle lights that improve your car's appearance and functionality by putting quality, safety, and correct installation methods first. Do your homework, take your time, and appreciate the added convenience and flair that properly fitted puddle lights provide.

